Components
AdBlock/Filter list decoding
Warning
This component is not activated by default.
Why do we need it?
As some people may want to test the content of their AdBlock/Filter list, we offer a way to decode them!
How does it work?
Note
Want to read the code ? It’s here:
AdblockInputLine2Subject!
We keep it simple by trying to comply with the Adblock Plus filters explained documentation. For us, the relevant parts are the one which defines/explains which domains are being blocked from a given rule.
Note
A more aggressive extraction might be planned in the future.
How to use it?
You can simply change
cli_decoding:
    adblock: False

    # Activate this only if you want to get as much as possible.
    adblock_aggressive: False
to
cli_decoding:
    adblock: False

    # Activate this only if you want to get as much as possible.
    adblock_aggressive: False
into your personal .PyFunceble.yaml or use the --adblock
argument from the CLI to activate it.
Autocontinue
Why do we need it?
The auto-continue logic was originaly created for one purpose: Testing long files inside Travis CI. As Travis CI session has a time limit of 45 minutes, it became vital for us to be able to stop and continue the test from where we were under those 45 minutes. This is how it started.
Today, - and it might be controversial - it is used by most people who aren’t under a Travis CI container to continue when the machine or tool crashes.
How does it work?
Note
Want to read the code ? It’s here:
ContinueDatasetBase()!
We log every subject already tested previously and remove them completely when we are done with the test of the given file.
How to use it?
It is activated by default but you can simply change
cli_testing:
    autocontinue: False
to
cli_testing:
    autocontinue: True
into your personal .PyFunceble.yaml or use the --continue
argument from the CLI to reactivate it.
Certificate verification
Warning
This component is not activated by default.
Why do we need it?
You might sometime be sure that every URL tested with PyFunceble have a valid certificate. This what it’s all about!
How does it work?
By default we don’t check the certificate, but if you choose to activate this,
as soon as the verification is failed, an INACTIVE status will be
returned while testing for URL.
How to use it?
Simply change
verify_ssl_certificate: False
to
verify_ssl_certificate: True
into your personal .PyFunceble.yaml or use
the --verify-ssl-certificate argument from the CLI to activate it.
Cleaning
Why do we need it?
Because we constantly need to clean files which are not needed before starting a new test, we embedded our cleaning logic.
How does it work?
Note
Want to read the code ? It’s here
FilesystemCleanup!
It has an internal map of what has to be deleted and how.
How to clean?
For a simple clean, run PyFunceble with the clean-pyfunceble CLI tool.
For a complete cleaning, run PyFunceble with the clean-pyfunceble CLI
tool along with the --all argument.
Complements Generation
Warning
This component is not activated by default.
Why do we need it?
Let’s say we have example.org but www.example.org
(or vice-versa) is not into my list.
This component (if activated) let us test www.example.org
(or vice-versa) even if it’s not into the input list.
How does it work?
Note
Want to read the code ? It’s here
Subject2Complements!
At the end of the normal test process, we generate the list of complements and test them.
How to use it?
You can simply change
cli_testing:
    # Activates the generation of complements.
    complements: False
to
cli_testing:
    # Activates the generation of complements.
    complements: True
into your personal .PyFunceble.yaml or use the --complements
argument from the CLI to activate it.
Configuration
Why do we need it?
As we wanted to be able to manage the options without having to always update the CLI call, we introduced the configuration logic and file.
How does it work?
Note
Want to read the configuration loader code ?
It’s here ConfigLoader!
When you are using an argument from the CLI, what we actually do is parse them into our configuration logic.
In the other side, if we first look for the .PyFunceble.yaml file.
If not found, we get/generate it and then parse it to our system.
Note
We also wanted to get rid of the configuration for an end-user point of view, therefore almost all configuration indexed can be updated from the CLI.
In that case, we update the configuration with the different argument you gives us before parsing it to the system.
How to configure?
Update the .PyFunceble.yaml file or use the CLI.
Continuous Integration
Warning
This component is not activated by default.
Why do we need it?
The continuous integrations component is there to enable a continuous testing and integration in your workflow.
The idea is that: If you can use any of the supported Continuous Integration engine, use it, and use PyFunceble to work along your workflow.
How does it work?
Note
Want to read the code ? It’s here
ContinuousIntegrationBase!
After a given amount of minutes, we stop the tool, generate the percentage, run a given command (if found), commit all the changes we made to the repository and finally, push to the git repository.
How to use it?
As of today, PyFunceble should work under Travis CI and GitLab CI.
Warning
Along with the configuration file or the CLI setting, you are required to give the following environment variables:
GIT_EMAIL: The email to use for the commit.GIT_NAME: The name to use for the commit.GH_TOKEN: The GitHub token if you use Travis CI.GL_TOKEN: The GitLab token if you use GitLab CI.
The following from the configuration (or their equivalent from the CLI) are available for usage.
cli_testing:
    ci:
        # Provides everything related to the continuous integration.

        # Activates the continuous integration mode.
        # WARNING: Do not activate without asking or knowing what you are doing.
        active: False

        # Sets the commit message to apply each time except for the last one.
        commit_message: "PyFunceble - AutoSave"

        # Sets the commit message to apply at the very end of the test.
        end_commit_message: "PyFunceble - Results"

        # Sets the number of minutes  to wait before sftarting to save and stop
        # a session.
        max_exec_minutes: 15

        # Sets the working branch. This is the branch from where we are testing.
        branch: master

        # Sets the distribution branch. This is the branch that is going to get
        # the (final) results.
        distribution_branch: master

        # Sets the command to execute before each commits except the last
        # one.
        command: null

        # Sets the command to execute before the last commit.
        end_command: null
Custom DNS Protocol
Why do we need it?
Sometimes, your firewall may block the UDP protocol over port 53 or you simply want to use DNS-Over-TLS or why not DNS-Over-HTTPS and why not DNS-Over-TCP.
Since PyFunceble 4.0.0, to simplify such situations, it is possible to define the protocol to use for the DNS queries.
How does it work?
Note
Want to read the DNS query tool source code ?
It’s here DNSQueryTool!
We read your preferred protocol and use it.
How to use it?
By default, PyFunceble will use the UDP protocol. This can be changed with the ability to configure which DNS-Servers you like PyFunceble to use during the test.
You set this up with the CLI command --dns-protocol or insert it
into your personal .PyFunceble.yaml.
Note
As of today, here is the list of supported protocols.
UDP(default)TCPHTTPSTLS
dns:
    # Sets the protocol to use.
    # Available: UDP | TCP | HTTPS | TLS
    protocol: UDP
to
dns:
    # Sets the protocol to use.
    # Available: UDP | TCP | HTTPS | TLS
    protocol: TCP
Custom DNS Server
New in version 3.3.0.
Why do we need it?
Our testing tool may sometime use a DNS-server which isn’t suited for PyFunceble. This could by example be your own DNS-Firewall.
To avoid these situations, the program allows you to setup the DNS-Server that we need to use.
How does it work?
Note
Want to read the DNS query tool source code ?
It’s here DNSQueryTool!
What we do is that we parse and use your given server.
How to use it?
By default, PyFunceble will use the system-wide DNS settings. This can be changed with the ability to configure which DNS-Servers you like PyFunceble to use during the test.
You set this up with the CLI command --dns or insert it into your
personal .PyFunceble.yaml
dns;
    server: null
to
dns:
    server:
        - 88.198.70.39
        - 95.216.209.53
        - 116.203.32.67
        - 88.198.70.38
Changed in version 3.0.0.
It is now possible to assign a specific port to use with the DNS-Server.
If you don’t append a port number, the default DNS port (53) will be used.
$ pyfunceble --dns 88.198.70.38 95.216.209.53:53 116.203.32.67:853 \
    -f $DOMAIN_FILE
Custom User-Agent
Why do we need it?
As we need to be one in a middle of a connection to a webserver, the custom user agent is there for that!
How does it work?
We set the user-agent every time we request something with the http
and https protocols.
If a custom user agent is given, it will be used.
Otherwise, every 24 hours, we update our user-agents.json file which will be fetched by your local version to determine the user-agent to use.
How to use it?
Simply choose your browser and platform or provide us your custom one!
user_agent:
    browser: chrome
    platform: linux
    custom: null
into your personal .PyFunceble.yaml or use the --user-agent
(custom UA) argument from the CLI.
Available Browser
Here is a list of available and accepted browsers at this time.
chromeedgefirefoxieoperasafari
Available Platform
Here is a list of available and accepted platform at this time.
linuxmacosxwin10
What if we don’t give a custom User-Agent?
If you don’t set a custom User-Agent, we will try to get the latest one for the chosen browser and platform.
Databases
Why do we use “databases”?
We use databases to store data while we run the tests. When globally talking about databases, we are indirectly talking about the following subsystems.
- Autocontinue
- InactiveDB
- WhoisDB
How do we manage them?
They consist of simple CSV files which are read and updated on the fly.
Warnings around Database (self) management
Warning
If you plan to delete everything and still manage to use PyFunceble in the
future, please use the clean-pyfunceble CLI.
Indeed, it will delete everything that we generated, except the things like the WHOIS database file/table which saves (almost) static data which should be reused in the future.
Deleting, for example, the WHOIS database file/table will just make your test run for a much longer time if you retest subject that used to be indexed into the whois database file/table.
Databases types
Since PyFunceble 2.0.0 (equivalent of >=1.18.0.dev),
we offer multiple database types which are (as per configuration) csv
(default since 4.0.0), mariadb and mysql.
Why different database types?
With the introduction of the multiprocessing logic, it became natural to introduce other database formats.
How to use the mysql or mariadb format?
Create a new user, password and database (optional) for PyFunceble to work with.
Create a
.pyfunceble-envfile at the root of your configuration directory.Complete it with the following content (example)
PYFUNCEBLE_DB_CHARSET=utf8mb4
PYFUNCEBLE_DB_HOST=localhost
PYFUNCEBLE_DB_NAME=PyFunceble
PYFUNCEBLE_DB_PASSWORD=Hello,World!
PYFUNCEBLE_DB_PORT=3306
PYFUNCEBLE_DB_USERNAME=pyfunceble
Note
Since version
2.4.3.devit is possible to use the UNIX socket for thePYFUNCEBLE_DB_HOSTenvironment variable.The typical location for
mysqld.sockis/var/run/mysqld/mysqld.sock.This have been done to make
1. It easier to use the
socketin conjunction with a supported CI environment/platform.- Leaving more space on the IP-stack on local DB installations.
3. The
UNIX:SOCKETis usually faster than the IP connection on local runs.PYFUNCEBLE_DB_CHARSET=utf8mb4 PYFUNCEBLE_DB_HOST=/var/run/mysqld/mysqld.sock PYFUNCEBLE_DB_NAME=PyFunceble PYFUNCEBLE_DB_PASSWORD=Hello,World! PYFUNCEBLE_DB_PORT=3306 PYFUNCEBLE_DB_USERNAME=pyfunceble
Switch the
db_typeindex of your configuration file tomysqlormariadb.Play with PyFunceble!
Note
If the environment variables are not found, you will be asked to prompt the information.
Directory Structure
Why do we need it?
As we wanted the end-user to be able to work from everywhere into the filesystem,
we created a logic which will create and keep the output/ directory which
complies with our source code.
How does it work?
Note
Want to read the code ?
It’s here
PyFunceble.cli.filesystem.dir_structure.backup.DirectoryStructureBackup
and
PyFunceble.cli.filesystem.dir_structure.backup.DirectoryStructureRestoration!
After each version, the maintainer run the production-pyfunceble CLI
which will prepare the repository for production.
That has the side effect to map the maintainer’s version of the
output/__pyfunceble_origin__ directory into a file called
dir_structure_production.json which is then bundled into the PyPI
package.
Once pushed, on the end-user side, when testing for file, that file is
copied from the Python Package into
a file called dir_structure.json which is then used to restore/create a
a perfect copy of the output directory the maintainer had when pushing the new
version.
DNS Lookup
Why do we need it?
As our main purpose is to check the availability of the given subjects, we make a DNS lookup to determine it.
How does it work?
For domains
In order:
- Request the
NSrecord. - If not found, request the
Arecord. - If not found, request the
AAAArecord. - If not found, request the
CNAMErecord. - If not found, request the
DNAMErecord.
Warning
If none is found, we call the UNIX/C equivalent of getaddrinfo().
For IP
We request the PTR record for the IP.
Warning
If none is found, we call the UNIX/C equivalent of gethostbyaddr()
or getaddrinfo().
How to use it?
It is activated by default but if not simply change
lookup:
    # Activates the usage of the DNS lookup.
    dns: False
to
lookup:
    # Activates the usage of the DNS lookup.
    dns: True
into your personal .PyFunceble.yaml or use the --no-whois
argument from the CLI to reactivate it.
Environment variables
Dotenv files
Since PyFunceble 2.0.0 (equivalent of PyFunceble-dev >=1.18.0),
we load (thanks to python-dotenv) the content of
the following files into the (local) list of environment variables.
.env(current directory).pyfunceble-env(current directory).env(configuration directory).pyfunceble-env(configuration directory)
To quote the python-dotenv documentation, a .env should look
like the following:
# a comment and that will be ignored.
REDIS_ADDRESS=localhost:6379
MEANING_OF_LIFE=42
MULTILINE_VAR="hello\nworld"
What do we use and why ?
Here is the list of environment variables we use and how we use them if they are set.
| Environment Variable | How do we use it? |
DEBUG_PYFUNCEBLE |
Same as PYFUNCEBLE_DEBUG it’s just present for retro-compatibility. |
DEBUG_PYFUNCEBLE_ON_SCREEN |
Same as PYFUNCEBLE_DEBUG_ON_SCREEN it’s just present for retro-compatibility. |
PYFUNCEBLE_AUTO_CONFIGURATION |
Tell us if we have to install/update the configuration file automatically. |
PYFUNCEBLE_DB_CHARSET |
Tell us the MySQL charset to use. |
PYFUNCEBLE_DB_HOST |
Tell us the host or the Unix socket (absolute file path) of the MySQL database. |
PYFUNCEBLE_DB_NAME |
Tell us the name of the MySQL database to use. |
PYFUNCEBLE_DB_PASSWORD |
Tell us the MySQL user password to use. |
PYFUNCEBLE_DB_PORT |
Tell us the MySQL connection port to use. |
PYFUNCEBLE_DB_USERNAME |
Tell us the MySQL user-name to use. |
PYFUNCEBLE_DEBUG |
Tell us to log everything into the output/logs/*.log files. |
PYFUNCEBLE_DEBUG_LVL |
Sets the logging level to use. |
PYFUNCEBLE_LOGGING_LVL |
Same as PYFUNCEBLE_DEBUG_LVL. |
PYFUNCEBLE_DEBUG_ON_SCREEN |
Tell us to log everything to stdout |
PYFUNCEBLE_CONFIG_DIR |
Tell us the location of the directory to use as the configuration directory. |
PYFUNCEBLE_OUTPUT_DIR |
Same as PYFUNCEBLE_CONFIG_DIR it’s just present for retro-compatibility. |
PYFUNCEBLE_OUTPUT_LOCATION |
Tell us where we should generate the output/ directory. |
APPDATA |
Used under Windows to construct/get the configuration directory if PYFUNCEBLE_CONFIG_DIR is not found. |
GH_TOKEN |
Tell us the GitHub token to set into the repository configuration when using PyFunceble under Travis CI. |
GL_TOKEN |
Tell us the GitLab token to set into the repository configuration when using PyFunceble under GitLab CI/CD. |
GIT_EMAIL |
Tell us the git.email configuration to set when using PyFunceble under any supported CI environment. |
GIT_NAME |
Tell us the git.name configuration to set when using PyFunceble under any supported CI environment. |
TRAVIS_BUILD_DIR |
Used to confirm that we are running under a Travis CI container. |
GITLAB_CI |
Used to confirm that we are running under a GitLab CI/CD environment. |
GITLAB_USER_ID |
Used to confirm that we are running under a GitLab CI/CD environment. |
Execution time
Warning
This component is not activated by default.
Why do we need it?
As it is always nice to see how long we worked, we added this logic!
How does it work?
Note
Want to read the code ? It’s here
PyFunceble.cli.execution_time.ExecutionTime!
It shows the execution time on screen (stdout).
How to use it?
You can simply change
display_mode:
    # Activates the printing of the execution time.
    execution_time: False
to
display_mode:
    # Activates the printing of the execution time.
    execution_time: True
into your personal .PyFunceble.yaml or use the --execution
argument from the CLI to activate it.
Expiration Date
Why do we need it?
As we want to determine the availability from the WHOIS record - if available, we need to extract and provide the expiration date.
How does it work?
After the query of the WHOIS record, it is parsed so that we can extract the expiration date.
When successful, a date in the format 09-oct-1970 is provided to the
end-user. Otherwise, null is provided to those using the API and
Unknown to those using the CLI.
How to use it?
You can simply allow the usage of the WHOIS lookup through:
- the (Python) API,
- the CLI argument,
- or, your configuration file.
List filtering
Warning
This component is not activated by default.
Why do we need it?
While testing for file, you may find yourself in a situation where you only want to test subject which matches a given pattern. That’s what this component do.
How does it work?
We scan the list against the given pattern/regex and only test those who match it.
How to use it?
You can simply change
cli_testing:
    # Sets the filter to apply while reading the given input.
    # For example, if you give `\.info`, we will only test the subjects
    # who match `\.info`.
    file_filter: null
to
cli_testing:
    # Sets the filter to apply while reading the given input.
    # For example, if you give `\.info`, we will only test the subjects
    # who match `\.info`.
    file_filter: "\.org"
(for example)
into your personal .PyFunceble.yaml or use the --filter argument from the CLI.
HTTP Status Code
Why do we need it?
As we want to determine the availability of a domain, IP, or URL; one of our testing method is the gathering of the HTTP status code.
How does it work?
Note
We never send a generic User-Agent. You can define your own or let PyFunceble choose one of the latest one of one of the major browser for you.
When it is the turn of the HTTP status code lookup tool to try to gather a status for the given subject, an HTTP query is made to the given IP, domain or subject.
When testing for a domain, a successful HTTP response is considered as
ACTIVE.
Otherwise, the following default classification applies.
Note
The classification can be changed by end-user through their configuration file.
As ACTIVE
Please note that the following HTTP status codes are considered as ACTIVE.
If you are using the CLI with the analytic files generated, you will get any matching subject flagged as ACTIVE officially and into your analytic files.
100: Continue101: Switching Protocols102: Processing200: OK201: Created202: Accepted203: Non-Authoritative Information204: No Content205: Reset Content206: Partial Content207: Multi-Status208: Already Reported226: IM User429: Too Many Request.
As potentially ACTIVE
Please note that the following HTTP status codes are considered as potentially ACTIVE but still officially reported as ACTIVE when caught.
If you are using the CLI with the analytic files generated, you will get any matching subject flagged as ACTIVE officially and into your analytic files as potentially ACTIVE.
300: Multiple Choices301: Moved Permanently302: Found303: See Other304: Not Modified305: Use Proxy307: Temporary Redirect308: Permanent Redirect403: Forbidden405: Method Not Allowed406: Not Acceptable407: Proxy Authentication Required408: Request Timeout411: Length Required413: Payload Too Large417: Expectation Failed418: I’m a teapot421: Misdirect Request422: Unprocessable Entity423: Locked424: Failed Dependency426: Upgrade Required428: Precondition Required431: Request Header Fields Too Large500: Internal Server Error501: Not Implemented502: Bad Gateway503: Service Unavailable504: Gateway Timeout505: HTTP Version Not Supported506: Variant Also Negotiates507: Insufficient Storage508: Loop Detected510: Not Extended511: Network Authentication Required
As INACTIVE or potentially INACTIVE
Please note that the following HTTP status codes are considered as INACTIVE or potentially INACTIVE. Therefore officially reported as INACTIVE when caught.
If you are using the CLI with the analytic files generated, you will get any matching subject flagged as INACTIVE officially and into your analytic files as potentially INACTIVE.
400: Bad Request402: Payment Required404: Not Found409: Conflict410: Gone412: Precondition Failed414: Request-URI Too Long415: Unsupported Media Type416: Request Range Not Satisfiable451: Unavailable For Legal Reasons
How to use it?
You can simply allow the usage of the HTTP status code lookup through:
- the (Python) API,
- the CLI argument,
- or, your configuration file.
IANA Root Zone Database
Why do we need it?
We use it to check if an extension is valid/exists.
How does it work?
Note
Want to read the parser code ? It’s here
IanaDBGenerator!
The root zone database is saved into the iana-domains-db.json file.
It is formatted like below and is automatically merged for the end-user before
each test run.
{
    "extension": "whois_server"
}
In-app, while testing for a domain, we check if the extension is listed there
before doing some extra verifications.
If not, domain(s) will be flagged as INVALID.
How to generate it manually?
You can’t and should not as we are automatically generating it every 24 hours.
But using the iana-pyfunceble CLI will do the job on purpose.
Test in/for local hostnames, IPs, components
Warning
This component is not activated by default.
Why do we need it?
As we may need to test for local hostnames, IPs, components in a local network, this component allows a less aggressive way of syntax validation.
How does it work?
We simply use a less aggressive syntax validation so that everything you give us is being tested.
How to use it?
Simply change
cli_testing:
   # Acknowleadges that we may test for local network component.
   # NOTE: Activating this, will remove the syntax checker completely.
   local_network: False
to
cli_testing:
   # Acknowleadges that we may test for local network component.
   # NOTE: Activating this, will remove the syntax checker completely.
   local_network: True
into your personal .PyFunceble.yaml or use the --local argument
from the CLI to activate it.
Logs Sharing
Note
This component is not activated by default.
Why do we need it?
We chose to initiate the logs sharing as some actions can really be random when working with millions of domains.
The idea and purpose of this feature are ONLY to make PyFunceble a better tool.
What is collected
Changed in version 4.0.0.
As of 4.0.0, we temporarly disabled and removed all data collection.
Indeed, I need to rewrite the infrastructure behind it. Therefore, I refused to implement any of the data collection source code until the infrastructure behind it is ready.
Warning
The following table only represent the option as available in the 3.x
version of PyFunceble.
| Event | Shared | URL |
| No WHOIS server (referrer) is found. |
|
https://pyfunceble.funilrys.com/api/no-referrer |
| The expiration date is not correctly formatted. |
|
https://pyfunceble.funilrys.com/api/date-format |
Mining
Warning
This component is not activated by default.
Why do we need it?
Sometimes you might, for example, want to get the list of domain(s) / URL(s) in a redirecting loop. This feature reveals them.
How does it work?
Note
Want to read the code ? It’s here
MinerWorker!
We access the given domain/URL and get the redirection history which we then test once we finished the normal test.
Warning
This component might evolve with time.
How to use it?
You can simply change
cli_testing:
    # Activates the mining of data.
    mining: False
to
cli_testing:
    # Activates the mining of data.
    mining: True
into your personal .PyFunceble.yaml or use the --mining argument
from the CLI to activate it.
Multiprocessing
Why do we need it?
Many people around the web who talked about PyFunceble were talking about one thing: We take time to run.
In the past, we implemented what was then called the “multiprocessing” method.
As of 4.0.0, we went away from the original multiprocessing logic.
The reason behind it was that the multiprocessing method we developed at the
time was becoming a nightmare to manage because we always had to take into
consideration that a process does not have access to the memory space of
the main process.
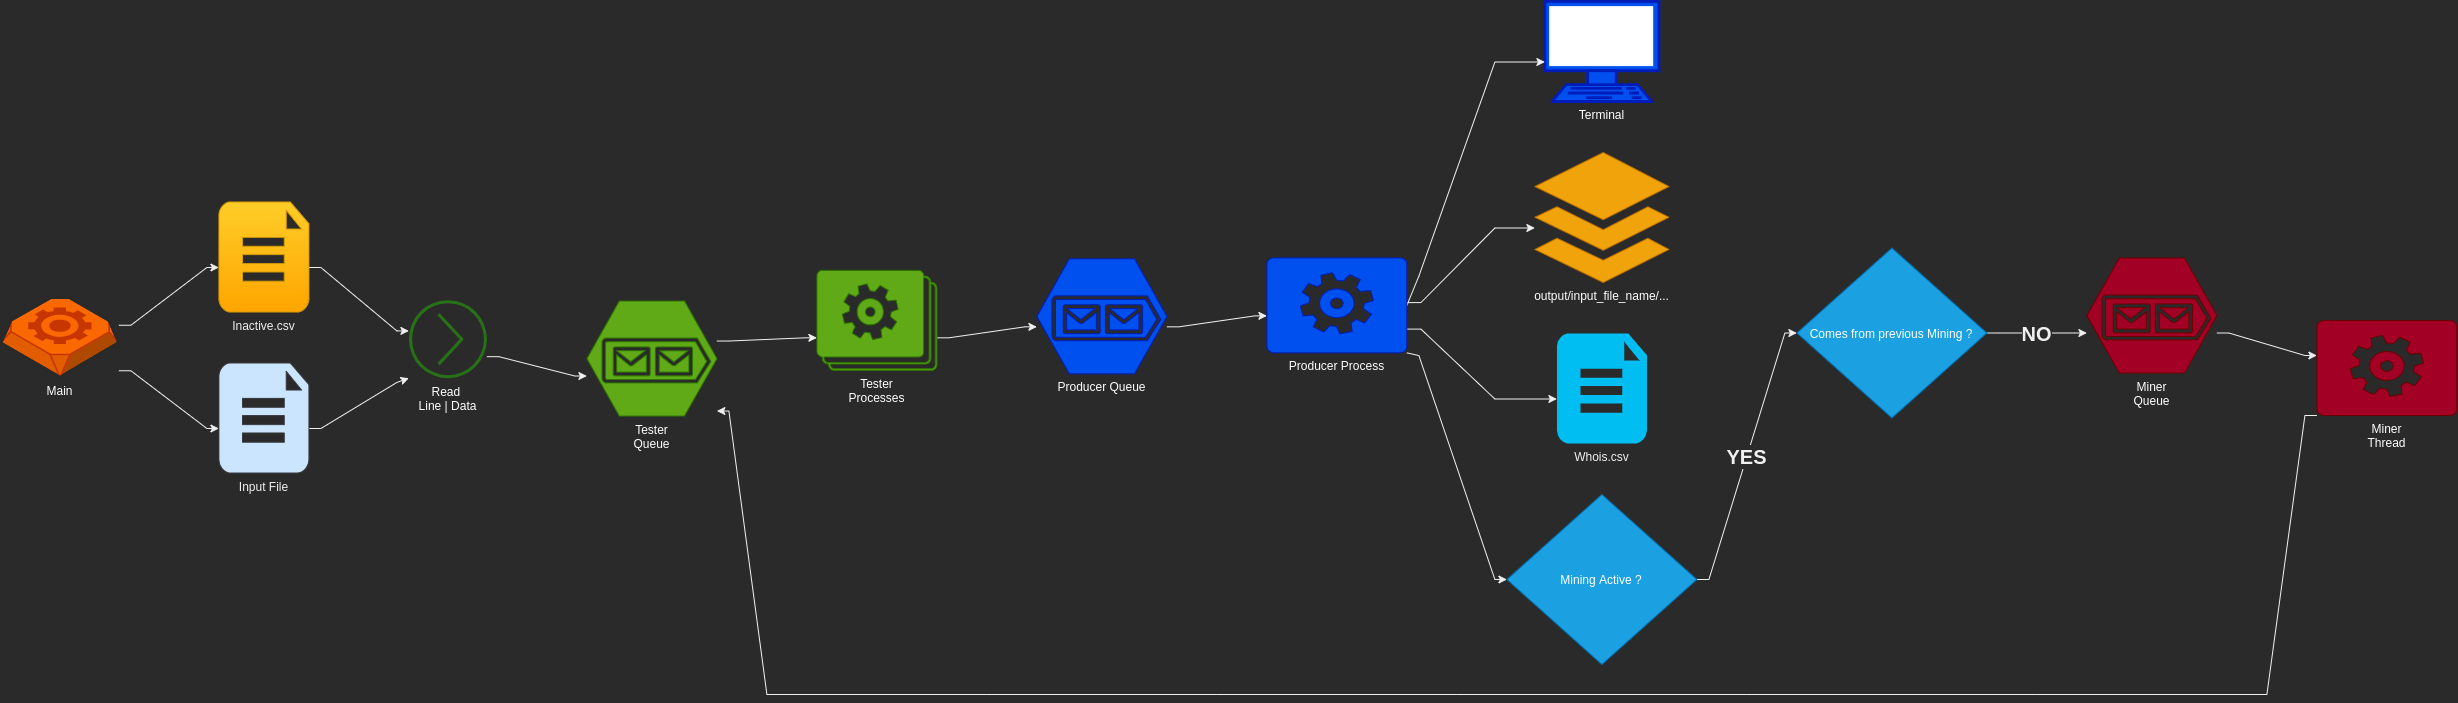
Therefore, we decided to rewrite it to be a bit more efficient. In the new layout, we work with queues to split the testing work through multiple test workers. That simplifies our data workflow and maintainability.
How does it work?
We read the given inputs, add them into some queues and generate some outputs through other queues or processes.
Here is a short representation of the process model behind the CLI testing:
How to use it?
As of 4.0.0, you don’t have the choice. It is available and is
systematically used as soon as you use the PyFunceble CLI.
But, you can control the maximum about of test worker through the
--max-workers argument or its configuration counterpart:
cli_testing:
    # Sets the number of maximal workers to use.
    # If set to null, the system use: CPU * Cores - 2
    max_workers: null
Outputted Files
Note
This section does not cover the log files.
Why do we need it?
We need a way to deliver our results.
How does it work?
After testing a given subject, we generate its output file based on what’s needed.
Host format
This is the default output file.
A line is formatted like 0.0.0.0 example.org.
Note
A custom IP can be set with the help of the custom_ip index or the
--hosts-ip argument from the CLI.
Don’t need it? Simply change
cli_testing:
    file_generation:
        # Activates the generation of the hosts file(s).
        hosts: False
to
cli_testing:
    file_generation:
        # Activates the generation of the hosts file(s).
        hosts: False
into your personal .PyFunceble.yaml or use the --hosts argument
from the CLI to deactivate it.
Plain format
A line is formatted like example.org.
Need it? Simply change
cli_testing:
    file_generation:
        # Activates the generation of the plain (or raw) file(s).
        plain: False
to
cli_testing:
     file_generation:
         # Activates the generation of the plain (or raw) file(s).
         plain: True
into your personal .PyFunceble.yaml or use the --plain argument
from the CLI to activate it.
Percentage
Warning
This component is activated by default while testing files.
Note
The percentage doesn’t show up - by design - while testing for single subjects.
Why do we need it?
We need it in order to get information about the amount of data we just tested.
How does it work?
Note
Want to read the code ? It’s here
FilesystemCounter!
Regularly or at the very end of a test we get the number of subjects for
each status along with the number of tested subjects.
We then generate and print the percentage calculation on the screen
(stdout) and into
output/${input_file_name}/logs/percentage/percentage.txt
How to use it?
It is activated by default, but if not please update
cli_testing:
    display_mode:
        # Activates the output of the percentage information.
        percentage: False
to
cli_testing:
    display_mode:
        # Activates the output of the percentage information.
        percentage: True
into your personal .PyFunceble.yaml or use the --percentage
argument from the CLI to reactivate it.
The Public Suffix List
Why do we need it?
We use it in the process of checking the validity of domains.
How does it work?
Note
Want to read the parser code ? It’s here
PublicSuffixGenerator!
The copy of the public suffix list we use is saved into the
public-suffix.json file.
It is formatted like below and is (periodically) automatically merged for the
end-user before each test run.
{
    "extension": [
        "suffix1.extension",
        "suffix2.extension",
        "suffix3.extension"
    ]
}
In-app, while testing for domain(s), we use it to know if we are checking for a subdomain or not.
How to generate it manually?
You can’t and should not as we are automatically generating it every 24 hours.
But, using the public-suffix-pyfunceble CLI will do the job on purpose.
Sorting
Note
While using the multiprocessing option, the data are tested as given.
Why do we need it?
Because sorted is better, we sort by default!
How does it work?
Note
Want to read the code ? It’s here:
standard()
and
hierarchical()!
Alphabetically
This is the default one. The standard()
function is used for that purpose.
Hierarchically
The objective of this is to provide sorting by service/domains.
The hierarchical()
function is used for that purpose.
Note
This is a simplified version of what we do.
- Let’s say we have
aaa.bbb.ccc.tdl. Note
The TDL part is determined. Indeed we first look at the IANA Root Zone database, then at the Public Suffix List.
- Let’s say we have
Let’s split the points. We then get a list
[aaa, bbb, ccc, tdl]Put the TDL first. It will gives us
[tdl, aaa, bbb, ccc]Reverse everything after the TDL. It will gives us
[tdl, ccc, bbb, aaa].Get the string to use for sorting. It will gives us
tdl.ccc.bbb.aaa.
How to activate the hierarchical sorting?
Simply change
cli_testing:
    sorting_mode:
        # Activates the hierarchical sorting.
        hierarchical: False
to
cli_testing:
    sorting_mode:
        # Activates the hierarchical sorting.
        hierarchical: True
into your personal .PyFunceble.yaml or use the --hierarchical
argument from the CLI to activate it.
SPECIAL rules
Why do we need it?
As PyFunceble grew up, I thought that a bit of filtering for special cases would be great to introduce. That where the idea came from.
How does it work?
Note
For any new suggestion of domains where a special rule can enhance PyFunceble please either open a new issue or make your contribution directly into the project.
Note
Contribution to the SPECIAL rules
To add directly to the special rules please modify both the source code extra_rules.py and the documentation (here).
Below is the list of all special rules that are implemented into PyFunceble. Please keep in mind that you can disable the usage those rules at any time.
*.000webhostapp.com
Any subjects matching the given pattern and the 410 status code are
supplied as INACTIVE.
*.angelfire.com
Any subjects matching the given pattern and the 404 status code are
supplied as INACTIVE.
*.blogspot.*
Any subjects matching the given pattern and:
- the
404status code - the
301status code that does not exists or are blocked by Google - the
303status code that are blocked by Google
are supplied as INACTIVE.
*.canalblog.com
Any subjects matching the given pattern and the 404 status code are
supplied as INACTIVE.
*.github.io
Any subjects matching the given pattern and the 404 status code are
supplied as INACTIVE.
*.hpg.com.br
Any subjects matching the given pattern and the 404 status code are
supplied as INACTIVE.
*.liveadvert.com
Any subjects matching the given pattern and the 404 status code are
supplied as INACTIVE.
*.skyrock.com
Any subjects matching the given pattern and the 404 status code are
supplied as INACTIVE.
*.tumblr.com
Any subjects matching the given pattern and the 404 status code are
supplied as INACTIVE.
*.wix.com
Any subjects matching the given pattern and the 404 status code are
supplied as INACTIVE.
*.wordpress.com
Any subjects matching the given pattern and the 301 status code along
with the pattern doesn’t exist are supplied as INACTIVE.
IP range
Any IPv4 and IPv6 ranges are supplied as ACTIVE.
How to use it?
Special rules are activated by default, but you can switch its usage through:
- the (Python) API,
- the CLI argument,
- or, your configuration file.
Status
Why do we need it?
We use it to provide a representation of the availability, syntax, or reputation of a given subject.
How does it work?
Multiple statuses are available to each checker. Each has its meaning and root.
INVALID
This the status that is supplied by the availability, syntax, or reputation checkers when the given subject is INVALID.
It is provided the subject does not pass our internal syntax checker.
The internal syntax checker analyzes the following against the given subject:
- If you are testing for a domain, is the extension registered in the IANA Root Zone Database?
- If you are testing for an IP, is it a valid IP (v4 or v6)?
- If you are testing for a URL, is it a valid one?
Warning
While using the CLI against a local network, this is ignored.
ACTIVE
This is the status that is supplied by the availability checker.
It is provided when one of the following is effective:
- We could query the WHOIS record and extract the expiration date out of it.
- We could query any of the
NS,A,AAAA,CNAMEorDNAMEof the given subject. - We could query the network information of the given subject.
- We could query the HTTP status code of the given subject.
VALID
This is the status that is supplied by the syntax checker.
It is provided when the syntax check of the given subject was successful.
Consider it as the equivalent of ACTIVE but for syntax checking.
MALICIOUS
This is the status that is supplied by the reputation checker.
It is provided when the following is effective:
- If you are testing for a domain, is its IPv4 known to be malicious?
- If you are testing for an IP, is its IPv4 known to be malicious?
- If you are testing for a URL, is the IPv4 of the hostname known to be malicious?
SANE
This is the status that is supplied by the reputation checker when the
MALICIOUS status is not effective.
Status Source
Why do we need it?
We use it to provide a representation of the testing method that led to the status.
How does it work?
Multiple status sources are available. Each has its meaning and root.
SYNTAX
This is the status source that is supplied when the syntax is the reason behind
the status. It is exclusively followed by the INVALID status.
You may find this status source behind the availability, syntax, or reputation checkers.
DNSLOOKUP
This is the status source that is supplied when the DNS lookup is the reason
behind the status. It is generally followed by either the ACTIVE or
INACTIVE status.
You will find this status source exclusively behind the availability checker.
NETINFO
This is the status source that is supplied when the Network Information is the
reason behind the status. It is exclusively followed by the ACTIVE
status.
You will find this status source exclusively behind the availability checker.
HTTP CODE
This is the status source that is supplied when the HTTP Status Code is the
reason behind the status. It is generally followed by either the
ACTIVE, or INACTIVE status.
You will find this status source exclusively behind the availability checker.
REPUTATION
This is the status source that is supplied when the reputation lookup is the
reason behind the status. It is generally followed by either the
ACTIVE, SANE, or MALICIOUS status.
You may find this status source behind the availability or reputation checkers.
SPECIAL
This is the status source that is supplied when our own sets of special rules
are the reasons behind the status. It is generally followed by either the
ACTIVE, or INACTIVE status.
You will find this status source exclusively behind the availability checker.
Whois Lookup
Note
While testing using PyFunceble, subdomains, IPv4 and IPv6 are not used against our whois lookup logic.
Why do we need it?
As our main purpose is to check the availability of the given subjects, we make a WHOIS lookup (if authorized) to determine it.
How does it work?
Note
Want to read the code ? It’s here
WhoisQueryTool!
For us the only relevant part is the extraction of the expiration date. Indeed, it’s an indicator if a domains is still owned by someone, we use it first to get the availability of domains.
How to use it?
It is activated by default but if not simply change
lookup:
    # Activates the usage of the WHOIS record.
    whois: False
to
lookup:
    # Activates the usage of the WHOIS record.
    whois: True
into your personal .PyFunceble.yaml or use the --no-whois
argument from the CLI to reactivate it.